
Creating a self-hosted agent in Azure DevOps using a virtual machine in Azure is a powerful way to take control of your build and deployment infrastructure. By leveraging Azure’s virtual machines, you can quickly spin up a customized, scalable environment to host your self-hosted agent. This approach allows you to configure your virtual machine with the exact tools and dependencies needed for your build and deployment process, ensuring consistency and reducing the risk of errors. In this process, you can automate the setup and configuration of the virtual machine using Azure DevOps, saving time and effort in managing your infrastructure.
In this post we will create the agent using Terraform and next we will configure the agent in Azure DevOps
Prerequisites :
- Create a project in Azure DevOps
- Create an azure account (create a free account from this link)
1-Creating an Ubuntu Virtual Machine
in this part , we are going to create a Ubuntu virtual machine in our subscription using Terraform (you can create the virtual machine from the portal or using powershell too ) .
Prerequisites :
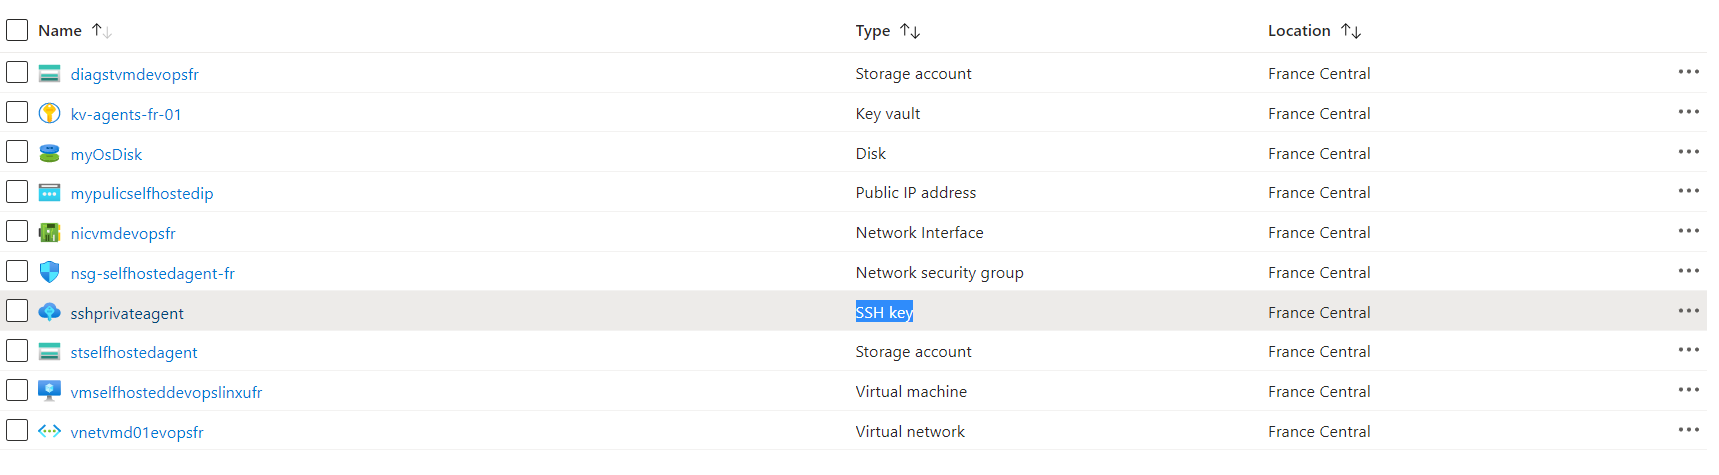
I have created a resource group in azure , a key-vault that will hold the secrets (our public keys) and a SSH key and I’m reading the data from the keyvault using terraform .
vm.tf
data "azurerm_key_vault" "kv-dev" {
  name                = "kv-agents-fr-01"
  resource_group_name = var.resource_group_name
}
data "azurerm_key_vault_secret" "pbk" {
  name         = "dev-publickey"
  key_vault_id = data.azurerm_key_vault.kv-dev.id
}

# Create virtual machine
resource "azurerm_linux_virtual_machine" "my_terraform_vm" {
  name                  = var.azurerm_linux_virtual_machine_name
  location              = var.resource_group_location
  resource_group_name   = var.resource_group_name
  network_interface_ids = [azurerm_network_interface.my_terraform_nic.id]
  size                  = var.azurerm_linux_virtual_machine_size

  os_disk {
    name                 = "myOsDisk"
    caching              = "ReadWrite"
    storage_account_type = "Premium_LRS"
  }

  source_image_reference {
    publisher = var.azurerm_linux_virtual_machine_publisher
    offer     = var.azurerm_linux_virtual_machine_offer
    sku       = var.azurerm_linux_virtual_machine_sku
    version   = "latest"
  }

  computer_name                   = var.computer_name
  admin_username                  = var.admin_username_vm
  disable_password_authentication = true

  admin_ssh_key {
    username   = var.admin_username_vm
    public_key = data.azurerm_key_vault_secret.pbk.value
  }

  boot_diagnostics {
    storage_account_uri = azurerm_storage_account.my_storage_account.primary_blob_endpoint
  }

  depends_on = [
    azurerm_storage_account.my_storage_account, azurerm_network_interface.my_terraform_nic
  ]

}
vnet.tf
# Create virtual network
resource "azurerm_virtual_network" "my_terraform_network" {
  name                = var.azurerm_virtual_network_name
  address_space       = ["10.0.0.0/16"]
  location            = var.resource_group_location
  resource_group_name = var.resource_group_name
}

# Create subnet
resource "azurerm_subnet" "my_terraform_subnet" {
  name                 = var.azurerm_subnet_name
  resource_group_name  = var.resource_group_name
  virtual_network_name = azurerm_virtual_network.my_terraform_network.name
  address_prefixes     = ["10.0.1.0/24"]

  depends_on = [
    azurerm_virtual_network.my_terraform_network
  ]
}


# Create network interface
resource "azurerm_network_interface" "my_terraform_nic" {
  name                = var.azurerm_network_interface_name
  location            = var.resource_group_location
  resource_group_name = var.resource_group_name

  ip_configuration {
    name                          = var.nic_configuration
    subnet_id                     = azurerm_subnet.my_terraform_subnet.id
    private_ip_address_allocation = "Dynamic"
    public_ip_address_id          = azurerm_public_ip.my_terraform_public_ip.id
  }

  depends_on = [
    azurerm_subnet.my_terraform_subnet, azurerm_public_ip.my_terraform_public_ip
  ]
}

# Connect the security group to the network interface
resource "azurerm_network_interface_security_group_association" "nsg_nic" {
  network_interface_id      = azurerm_network_interface.my_terraform_nic.id
  network_security_group_id = azurerm_network_security_group.my_terraform_nsg.id

  depends_on = [
    azurerm_network_interface.my_terraform_nic, azurerm_network_security_group.my_terraform_nsg
  ]
}
storage.tf
# Create storage account for boot diagnostics
resource "azurerm_storage_account" "my_storage_account" {
  name                     = var.azurerm_storage_account_name
  location                 = var.resource_group_location
  resource_group_name      = var.resource_group_name
  account_tier             = var.azurerm_storage_account_account_tier
  account_replication_type = "GRS"
}
nsg.tf
# Create Network Security Group and rule
resource "azurerm_network_security_group" "my_terraform_nsg" {
  name                = var.azurerm_network_security_group_name
  location            = var.resource_group_location
  resource_group_name = var.resource_group_name

  security_rule {
    name                       = "SSH"
    priority                   = 1001
    direction                  = "Inbound"
    access                     = "Allow"
    protocol                   = "Tcp"
    source_port_range          = "*"
    destination_port_range     = "22"
    source_address_prefix      = "*"
    destination_address_prefix = "*"
  }
}
ip.tf
# Create public IP for our vm
resource "azurerm_public_ip" "my_terraform_public_ip" {
  name                = var.ip_name
  location            = var.resource_group_location
  resource_group_name = var.resource_group_name
  allocation_method   = var.ip_allocation_method
}
variables.tf
variable "resource_group_location" {
  type        = string
  default     = "francecentral"
  description = "Location of the resource group."
}

variable "resource_group_name" {
  default = "selfhostedagent-loves-terraform-2023"
}

variable "resource_group_name_prefix" {
  type        = string
  default     = "rg"
  description = "Prefix of the resource group name that's combined with a random ID so name is unique in your Azure subscription."
}

variable "ip_name" {
  type    = string
  default = "mypulicselfhostedip"
}

variable "ip_allocation_method" {
  type    = string
  default = "Dynamic"
}

variable "azurerm_network_security_group_name" {
  type    = string
  default = "nsg-selfhostedagent-fr"
}

variable "azurerm_storage_account_account_tier" {
  type    = string
  default = "Standard"
}

variable "azurerm_linux_virtual_machine_name" {
  type    = string
  default = "vmselfhosteddevopslinxufr"
}

variable "azurerm_linux_virtual_machine_size" {
  type    = string
  default = "Standard_DS1_v2"
}


variable "azurerm_linux_virtual_machine_publisher" {
  type    = string
  default = "Canonical"
}

variable "azurerm_linux_virtual_machine_offer" {
  type    = string
  default = "0001-com-ubuntu-server-jammy"
}

variable "azurerm_linux_virtual_machine_sku" {
  type    = string
  default = "22_04-lts-gen2"
}

variable "computer_name" {
  type    = string
  default = "agent001"
}

variable "admin_username_vm" {
  type    = string
  default = "agent001admin"
}


variable "azurerm_virtual_network_name" {
  type    = string
  default = "vnetvmd01evopsfr"
}

variable "azurerm_subnet_name" {
  type    = string
  default = "subnetvmdevopsfr"
}


variable "azurerm_network_interface_name" {
  type    = string
  default = "nicvmdevopsfr"
}

variable "nic_configuration" {
  type    = string
  default = "nic_configuration_vmdevopsfr"
}


variable "azurerm_storage_account_name" {
  type    = string
  default = "diagstvmdevopsfr"
}
As you can see , I set admin_ssh_key for our virtual machine ,using SSH (Secure Shell) for connecting to a virtual machine in Azure is generally considered to be a more secure method compared to using a username and password combination. This is because SSH provides strong encryption and secure communication between the client and server, ensuring that sensitive data and credentials are protected from unauthorized access or interception.
the resources that we have now :
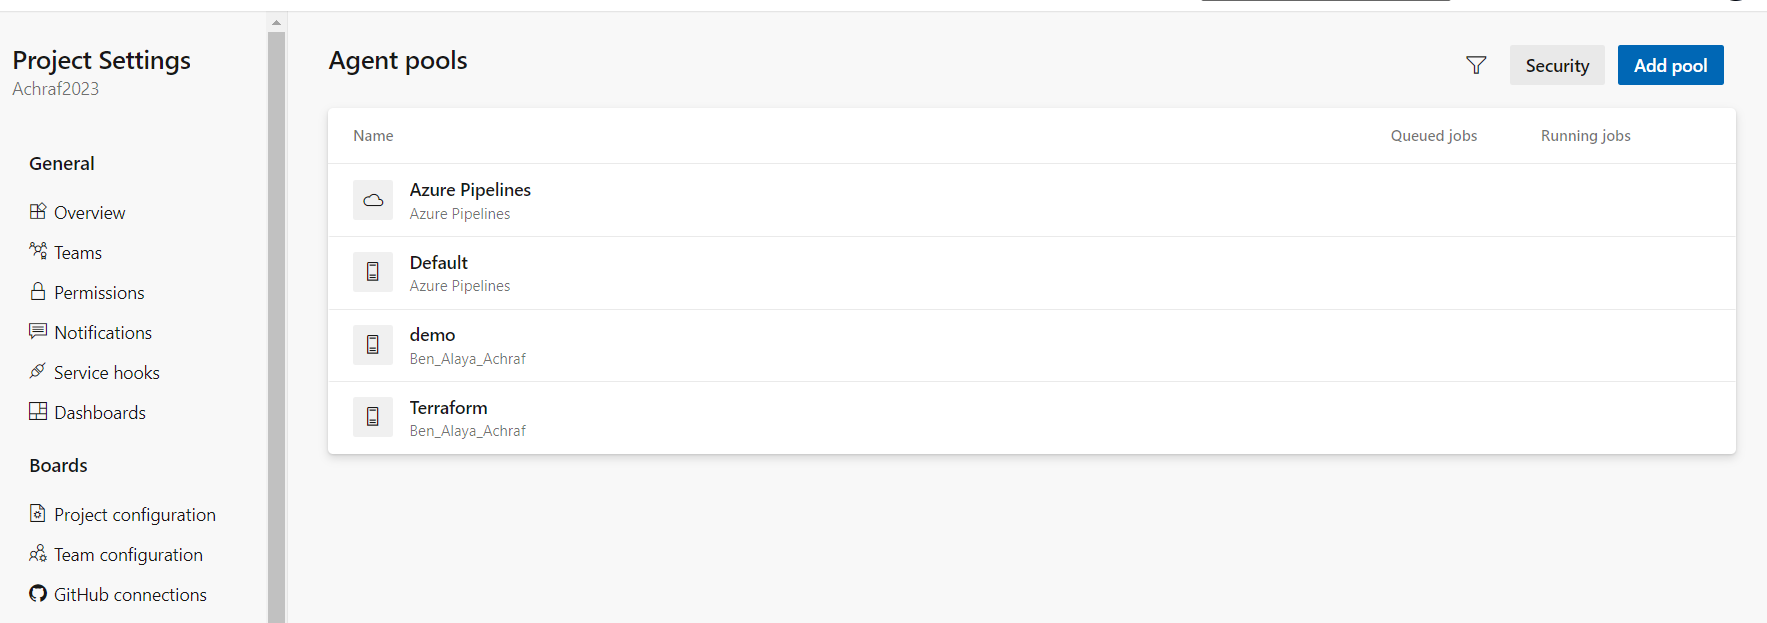
2 -Configure the Agent in DevOps
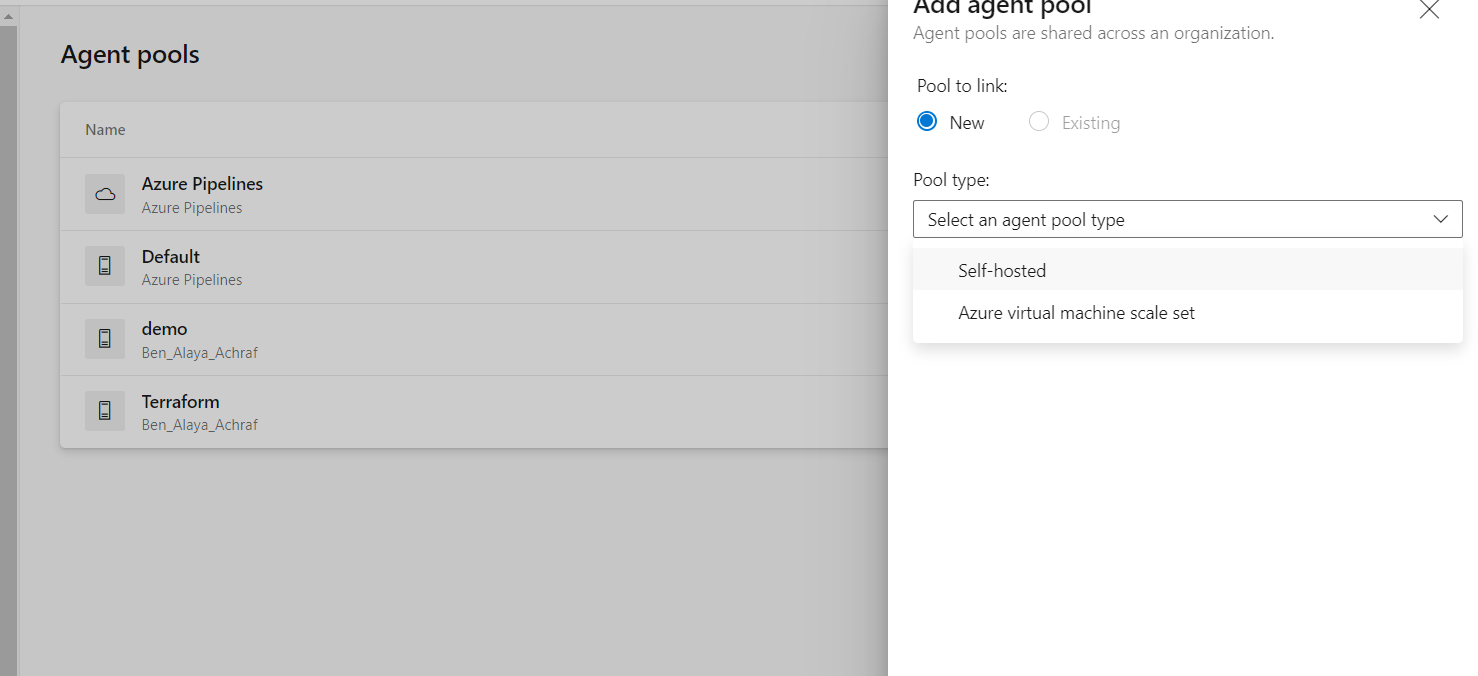
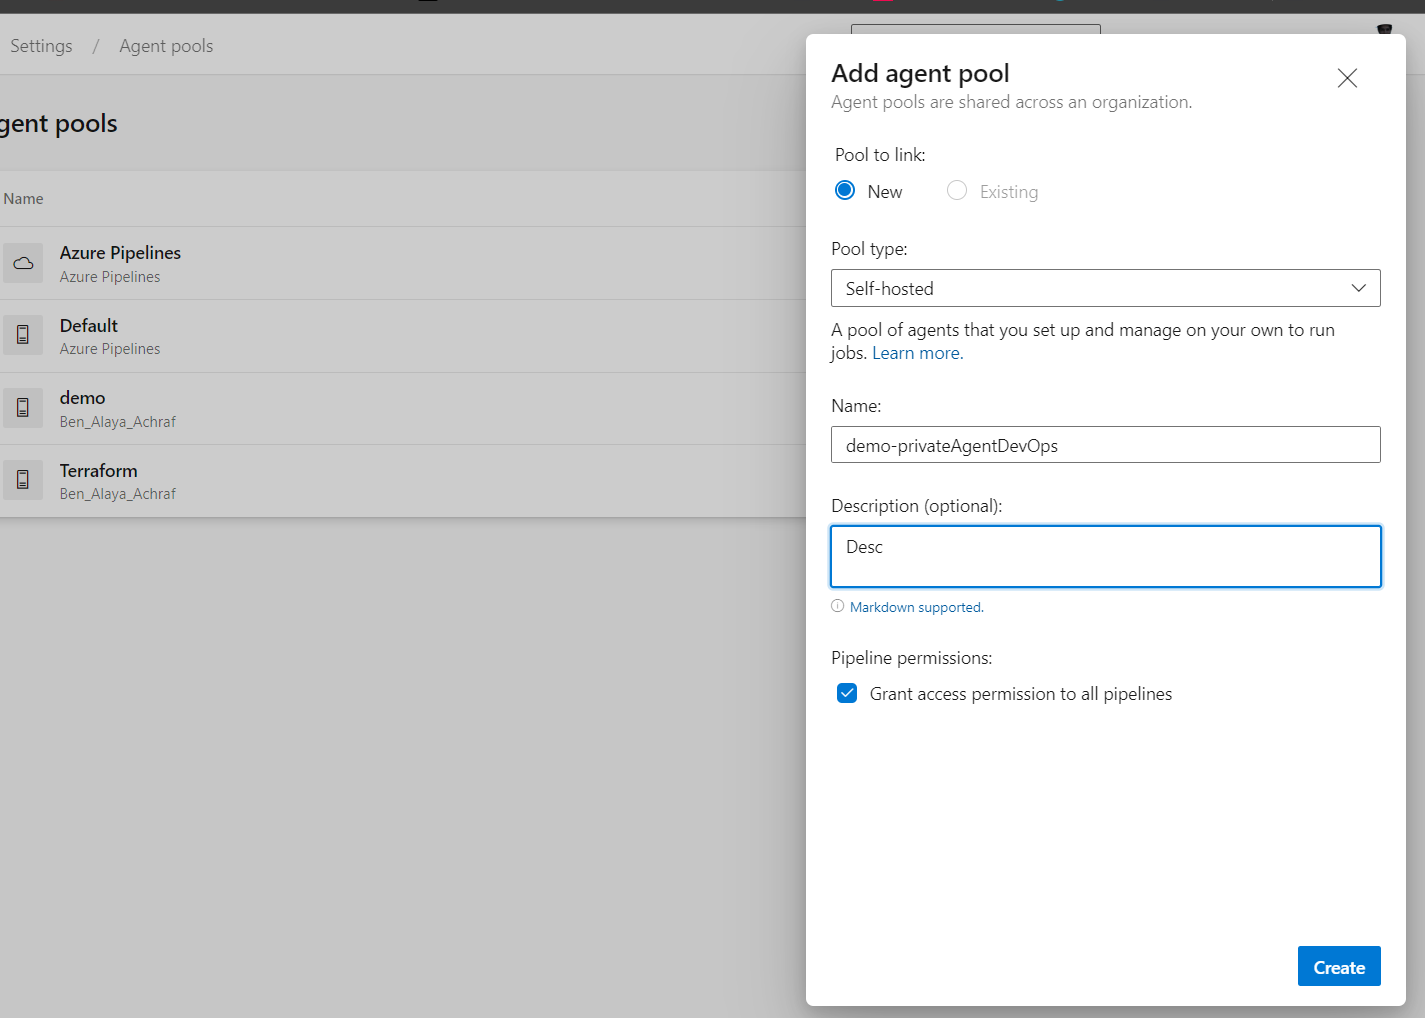
First thing to do is to go to azure devops , inside project settings , agent pools tab ,add pool :
Next , navigate to the new agent pool and click on “new agent”
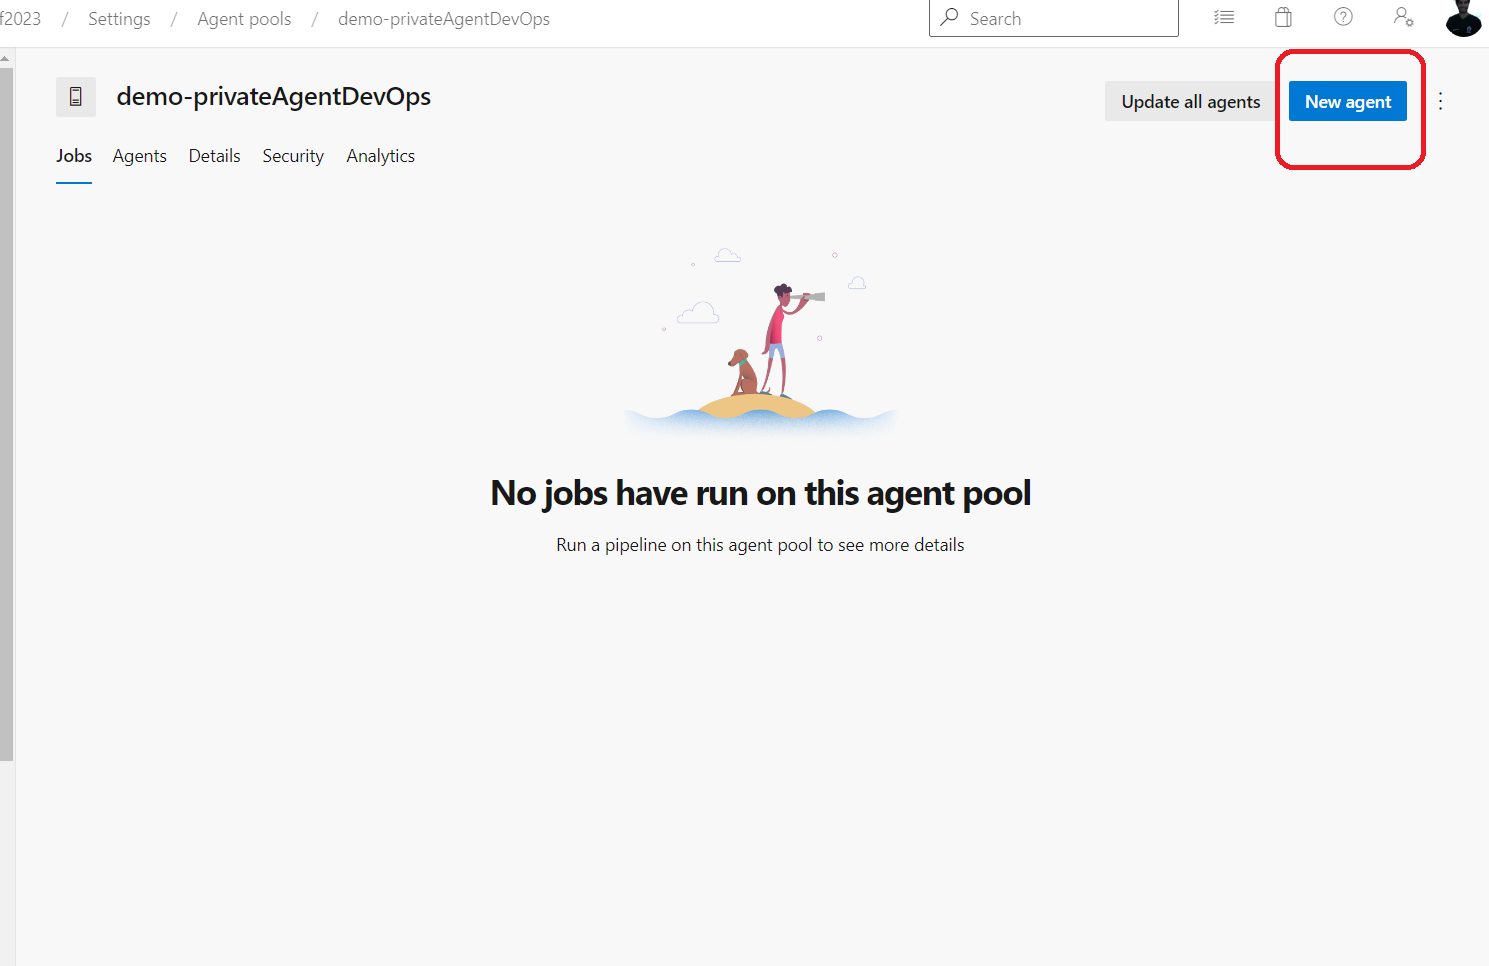
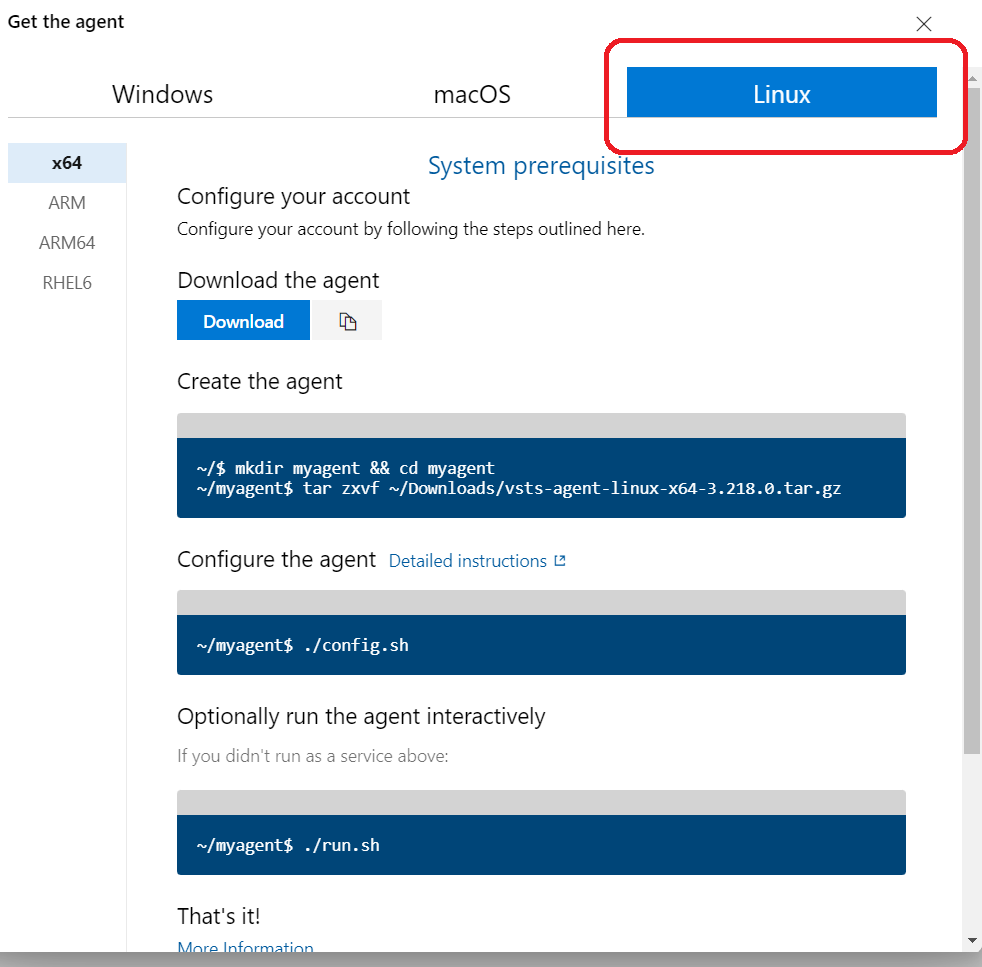
Choose linux and we are going to use the infos from that tab .
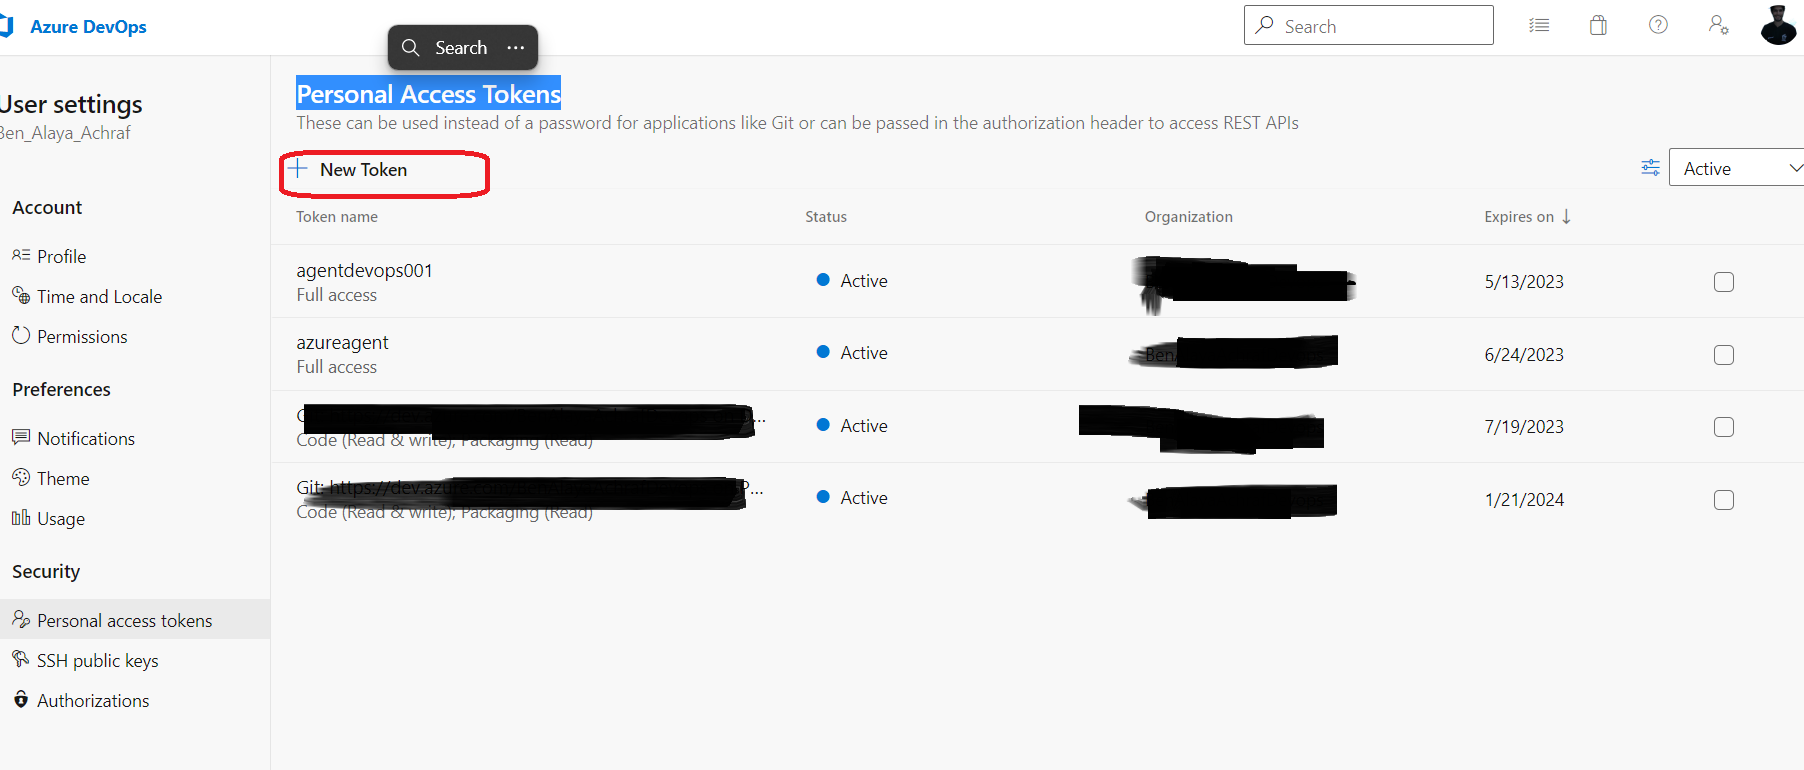
Before configuring the virtual machine we need to create a PAT ‘Personal Access Token’ that we are going to need in order to connect ,identify and give permission to our agent to the project . (go to https://dev.azure.com/projectname/_usersSettings/tokens)
 Now let’s connect to our virtual machine and set it up .
There is many ways/tools to connect to our virtual machine , i use mobaxterm because I like having access to multiple machines at the same time ,else you can use ssh to connect using the private key that we have saved when we have created the SSH key in azure .
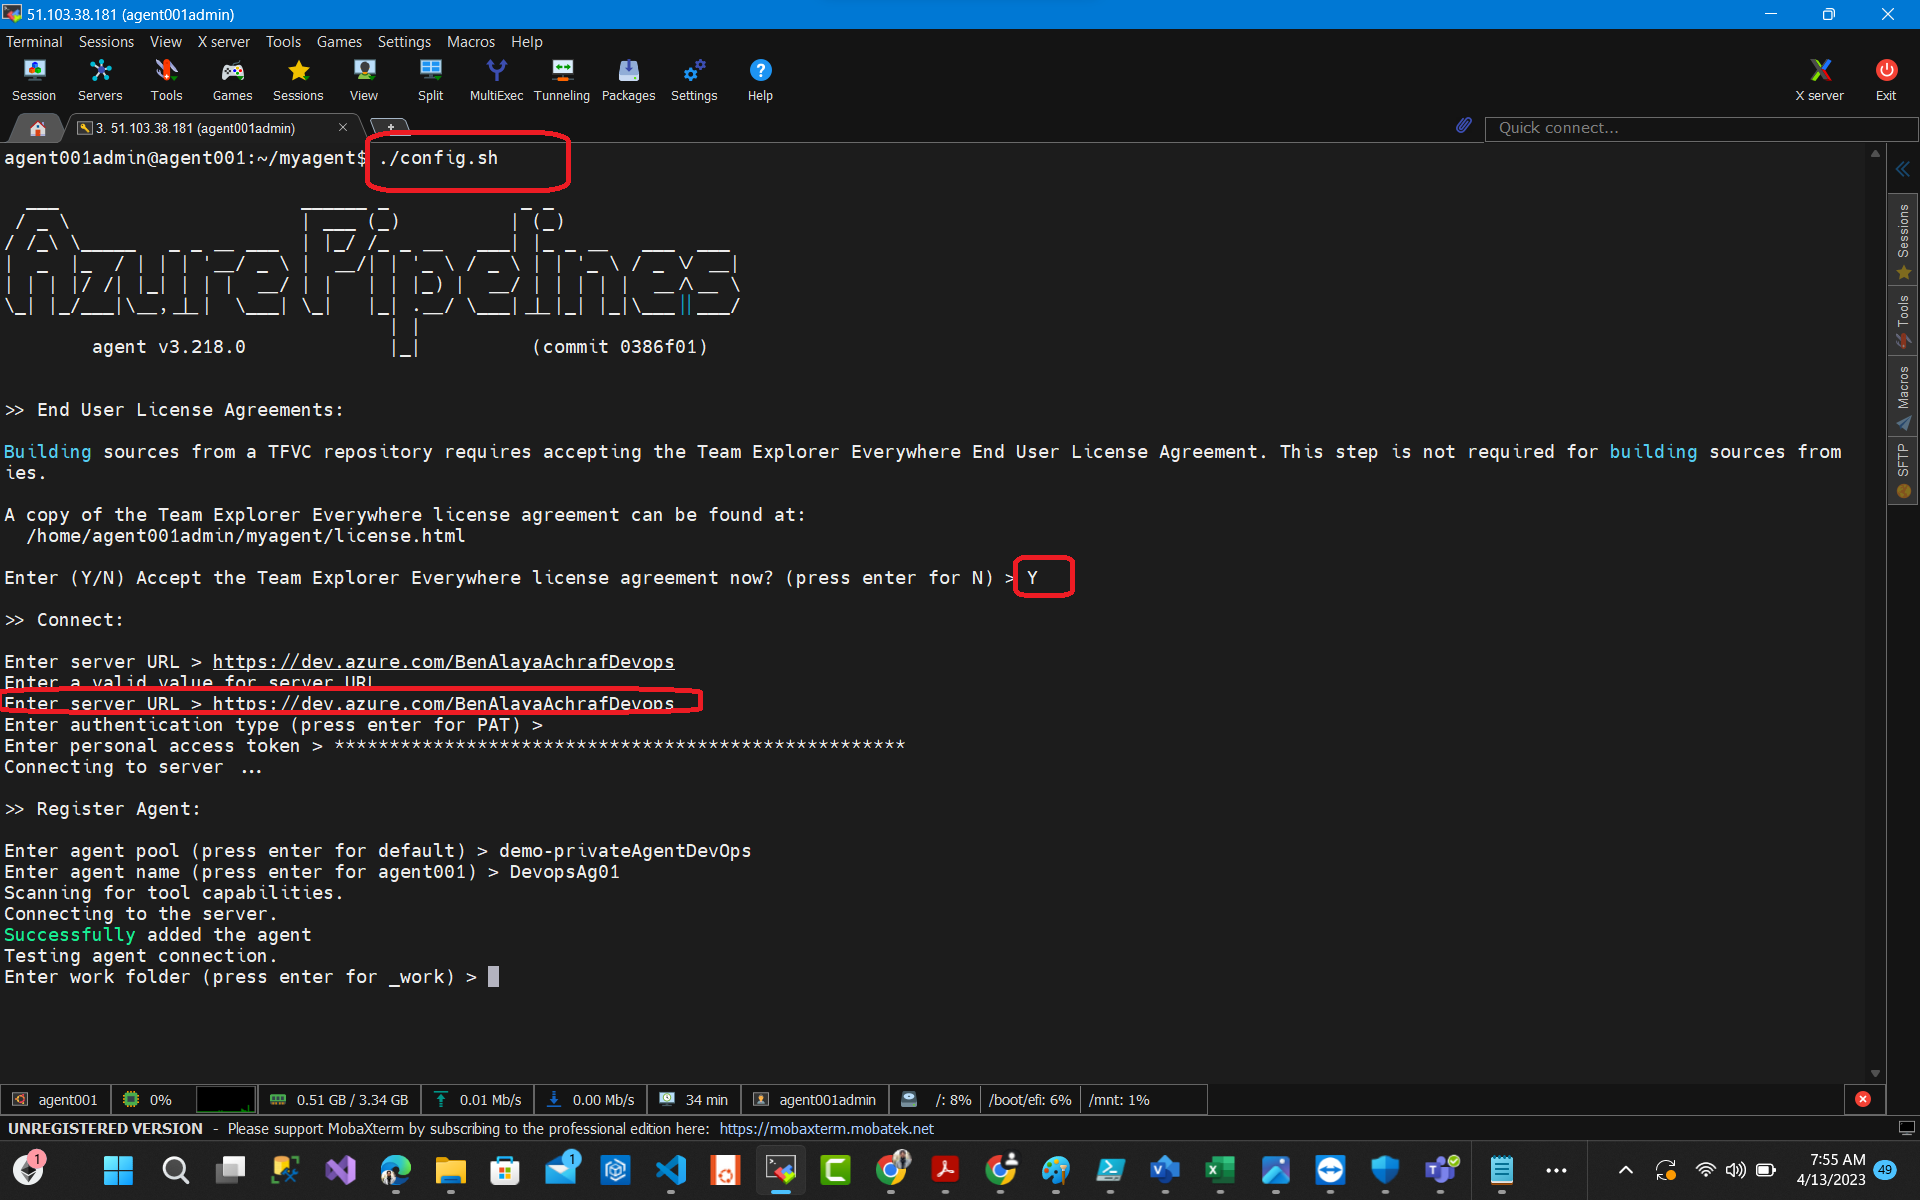
We used the following commands in order to setup our agent :
#download setup
wget https://vstsagentpackage.azureedge.net/agent/3.218.0/vsts-agent-linux-x64-3.218.0.tar.gz

mkdir myagent
cd myagent
#extract the setup
tar zxvf ~/Downloads/vsts-agent-linux-x64-3.218.0.tar.gz
#run this file to start the configuration
./config.sh

1- request azure devops organization : https://dev.azure.com/organization/
2-enter the PAT that you have created
3-Enter the name of the agent pool that we have created
Well after this if we visit the pool that we have created we will see the agent but on offline status
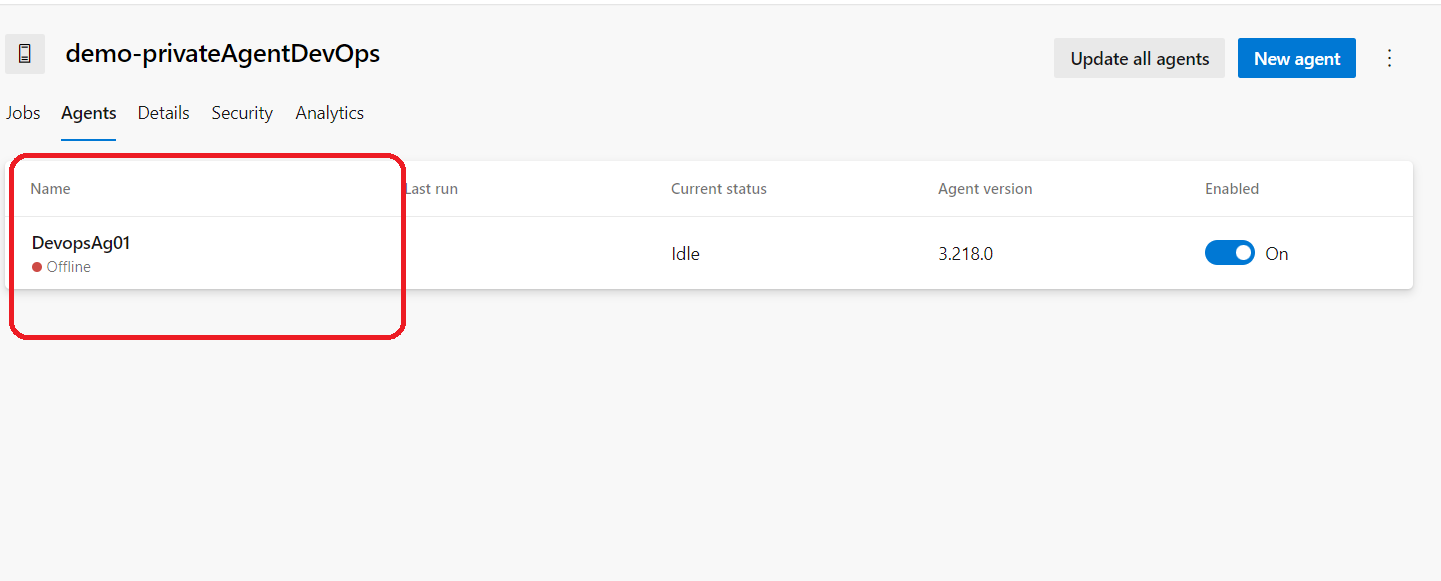
that’s because we did not start it yet we just have installed the requirements .
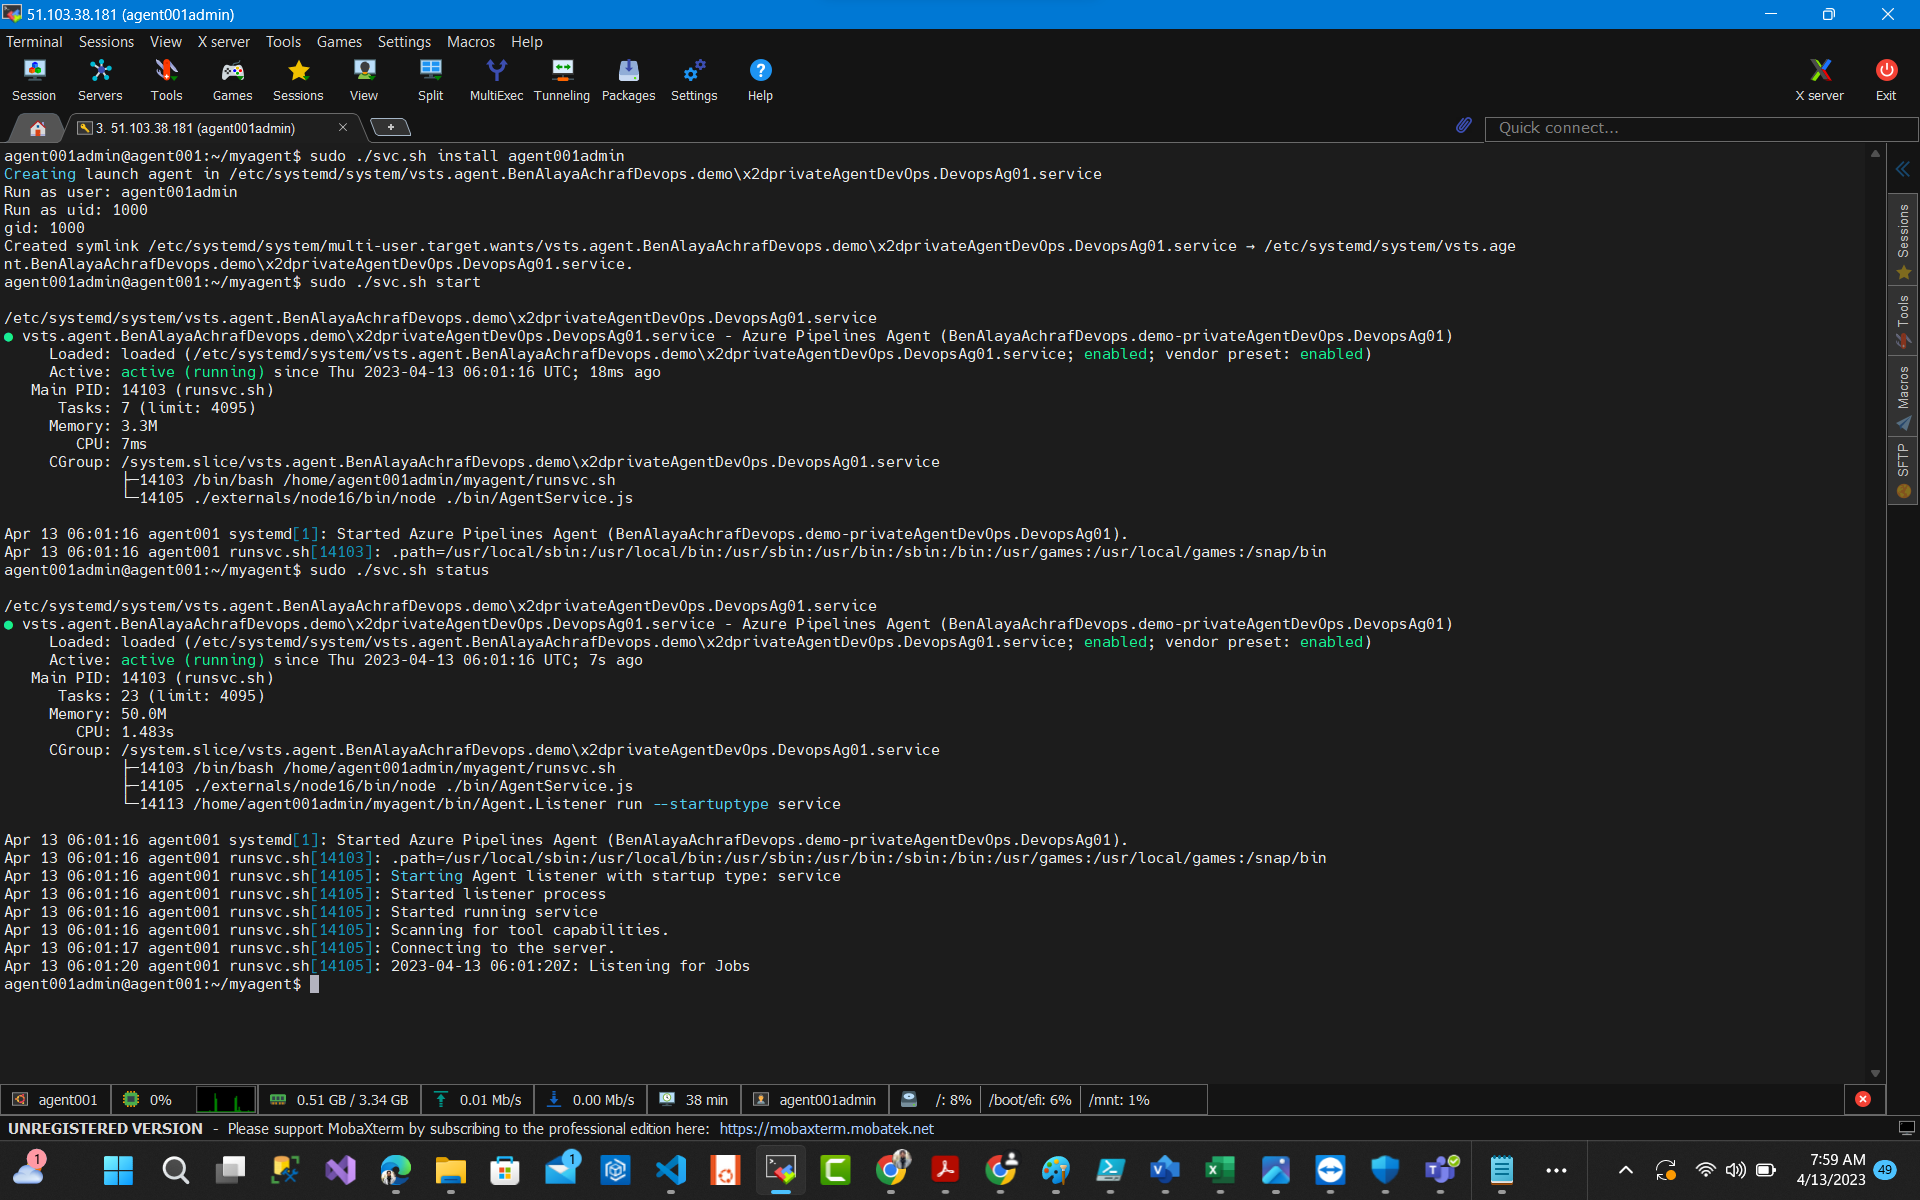
You can run your self-hosted agent as either a service or an interactive process. After you’ve configured the agent, for test you can use interactive but for production we should use As a service as we will d now
Inside our folder run the below commands :
sudo ./svc.sh install vmname

sudo ./svc.sh start
sudo ./svc.sh status

in order to stop
#sudo ./svc.sh stop
Now we have a service that will auto start with our machine when it restarts .
3- Installing tools on our agent :
To run our pipelines we need few things to be installed :
#  install zip to extract later our artifacts
 sudo apt install zip
#  install jq we are going to us it when we show our tfplan

sudo apt install jq

#  Azure-CLI

curl -sL https://aka.ms/InstallAzureCLIDeb | sudo bash

#  install Docker

sudo apt-get update
sudo apt-get install \
    apt-transport-https \
    ca-certificates \
    curl \
    gnupg \
    lsb-release

sudo mkdir -p /etc/apt/keyrings
curl -fsSL https://download.docker.com/linux/ubuntu/gpg | sudo gpg --dearmor -o /usr/share/keyrings/docker-archive-keyring.gpg

#  install Docker Engine

sudo apt-get update
sudo apt-get install docker-ce docker-ce-cli containerd.io docker-compose-plugin
We need to test docker before we proceed :
sudo docker run hello-world
In my case I had this error :
“Got permission denied while trying to connect to the Docker daemon socket at unix:///var/run/docker.sock”
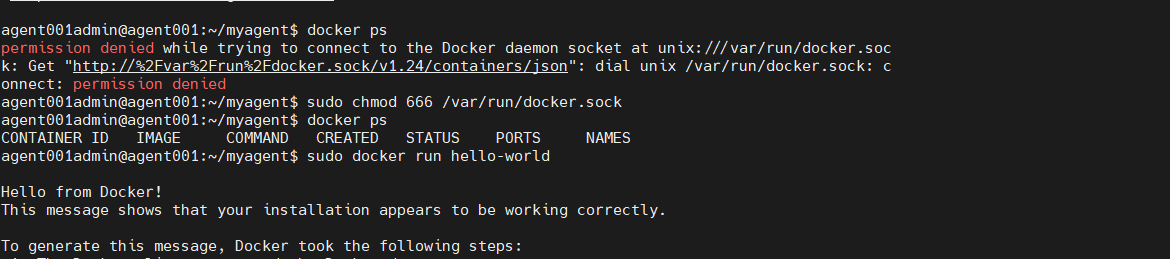
In order to fix this we need to apply the below command :
sudo chmod 666 /var/run/docker.sock
Now let’s see if our agent is ready in our pool :
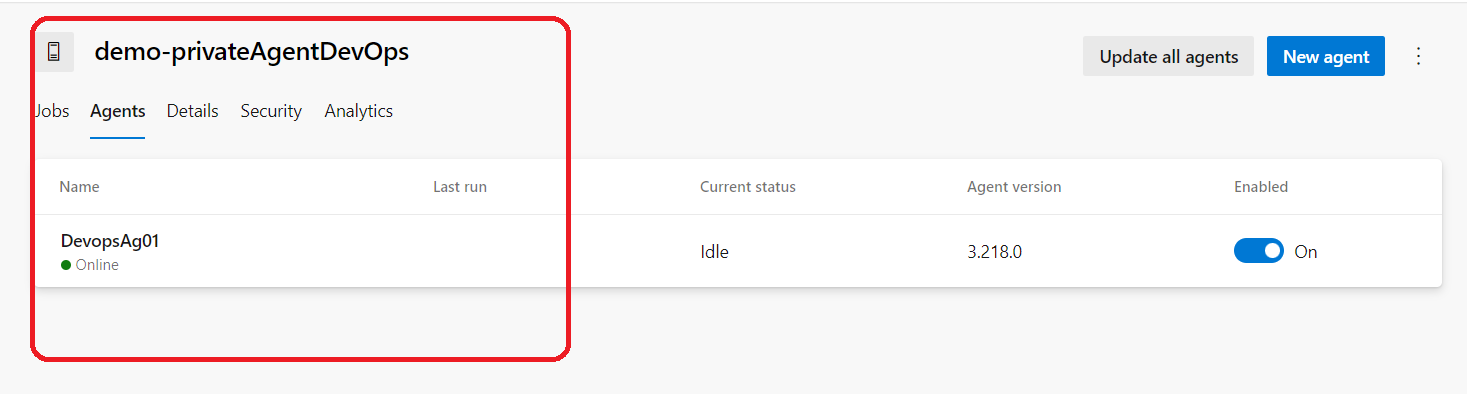 Green means Online ,we are set and ready to go .
let’s force our Ci pipeline to use the new pool that we have created using the below bloc :
pool:
  name: demo-privateAgentDevOps # Name of a pool.
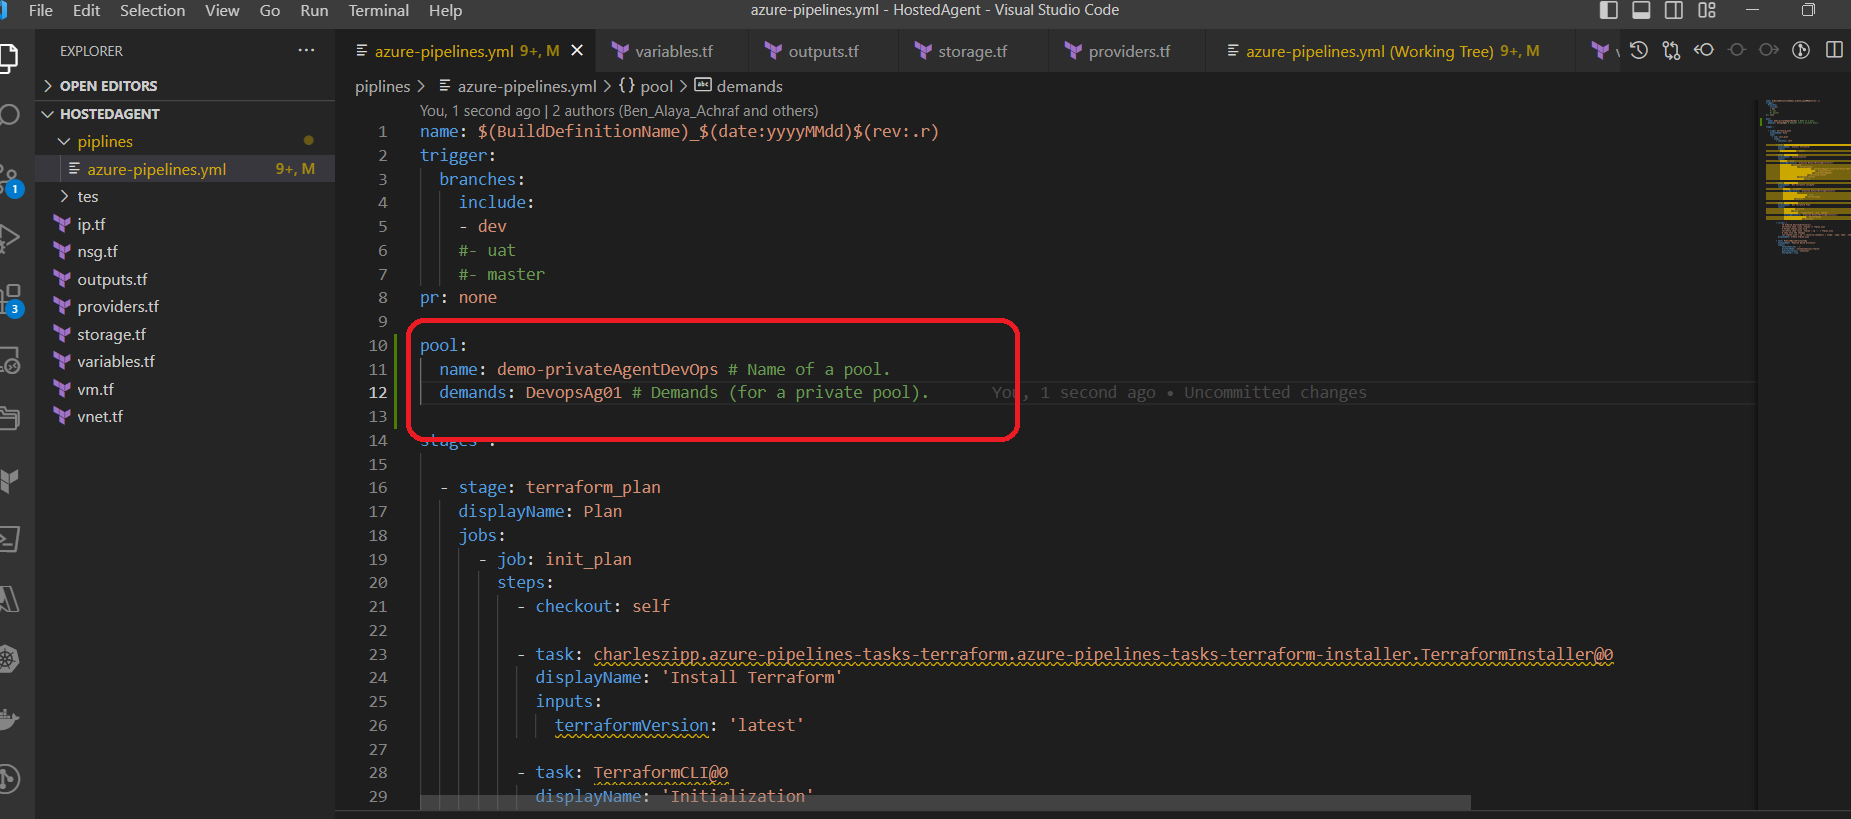 Full pipline :
name: $(BuildDefinitionName)_$(date:yyyyMMdd)$(rev:.r)
trigger:
  branches:
    include:
    - dev
pr: none

pool:
  name: demo-privateAgentDevOps # Name of a pool.
stages :

  - stage: terraform_plan
    displayName: Plan
    jobs:
      - job: init_plan
        steps:
          - checkout: self

          - task: charleszipp.azure-pipelines-tasks-terraform.azure-pipelines-tasks-terraform-installer.TerraformInstaller@0
            displayName: 'Install Terraform'
            inputs:
              terraformVersion: 'latest'

          - task: TerraformCLI@0
            displayName: 'Initialization'
            inputs:
              command: 'init'
              workingDirectory: '$(System.DefaultWorkingDirectory)/'
              backendType: 'azurerm'
              backendServiceArm: 'terrafromspn'
              backendAzureRmResourceGroupName: 'selfhostedagent-loves-terraform-2023'
              backendAzureRmResourceGroupLocation: 'francecentral'
              backendAzureRmStorageAccountName: 'stselfhostedagent'
              backendAzureRmContainerName: 'terraform-states'
              backendAzureRmKey: devagent.tfstate
              allowTelemetryCollection: true

          - task: TerraformCLI@0
            displayName: 'Run terraform validate'
            inputs:
                 command: 'validate'
                 workingDirectory: '$(System.DefaultWorkingDirectory)'
                 commandOptions:
                 allowTelemetryCollection: true
                 environmentServiceName: 'terrafromspn'
                 backendType: azurerm

          - task: TerraformCLI@0
            displayName: 'Run Terraform Plan'
            inputs:
                  backendType: azurerm
                  command: 'plan'
                  commandOptions: '-input=false  -out .tfplan'
                  workingDirectory: '$(System.DefaultWorkingDirectory)/'
                  environmentServiceName: 'terrafromspn'
                  publishPlanResults: 'dev-plan'

          - script: |
                cd $(Build.SourcesDirectory)/
                terraform show -json .tfplan >> tfplan.json
                # Format tfplan.json file
                terraform show -json .tfplan | jq '.' > tfplan.json
                # show only the changes
                cat tfplan.json | jq '[.resource_changes[] | {type: .type, name: .change.after.name, actions: .change.actions[]}]'
            displayName: Create tfplan.json

          - task: PublishBuildArtifacts@1
            displayName: 'Publish Build Artifacts'
            inputs:
                PathtoPublish: './'
                ArtifactName: 'selfhostedlinux-tfplan'
                publishLocation: 'Container'
                StoreAsTar: true
and now if we launch our pipeline we will see this inside our pool :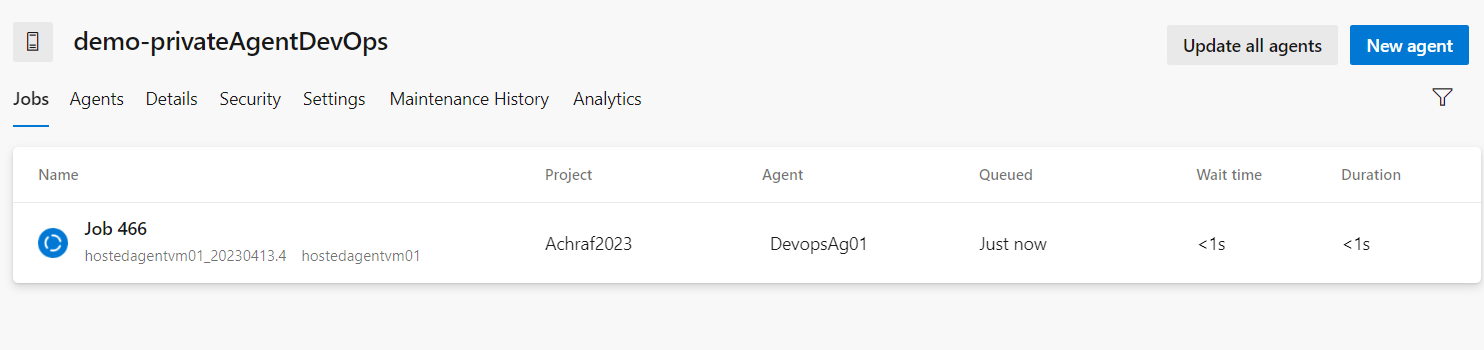 That’s it !
Using a self-hosted agent will enhance your build execution through incremental builds, which result in faster build times without the need to clean the repository or perform a clean build. However, with Microsoft-hosted agents, you won’t enjoy these benefits as the agents get destroyed after the pipeline execution. Additionally, the initiation time for your builds may increase with Microsoft-hosted agents, as the allocation process can take several minutes, depending on the system’s workload.
Hope you enjoyed this article !


Comments 2