After the success of past video and blog post of Blazor Write C# instead of JavaScript to Build a Client-Side Single-Page App I decided to create a cross platform application using xamarin.forms
Even though i was sick ,and after few of tries , I managed to create a video to demonstrate how we can consume the service that we have created and how I created the mobile application .
First , If you want to see what are we building , you can watch the video below .
Now , We are going to see step by step how we can :
How we can use conveyor to Access and test your web application from other devices, such as phones, tablets and computers, locally or over the web. Consume to Web Service Using Postman. Create the xamarin forms project. Create the Dataservice & use Mvvm . Next Steps. Conveyor Usually , when I create a web service , I deploy it to my azure account but this time and for some reasons , I wanted to test it on my localhost , but as you know you can’t just simply access that localhost from another computer or smartphone .
So when I was looking around for some solutions , which one of them was changing the configuration inside the applicationhost.config by changing :
<bindings>
               <binding protocol="http" bindingInformation="*:51889:localhost" />
               <binding protocol="https" bindingInformation="*:44351:localhost" />
       </bindings>
       <bindings>
           <binding protocol="http" bindingInformation="*:51889:localhost" />
           <binding protocol="http" bindingInformation="*:44351:pc-hostname" />
           <binding protocol="http" bindingInformation="*:44351:10.0.1.10" />
       </bindings>
Well this worked once , but after a while for some reasons It did stop and that’s when I found conveyor.
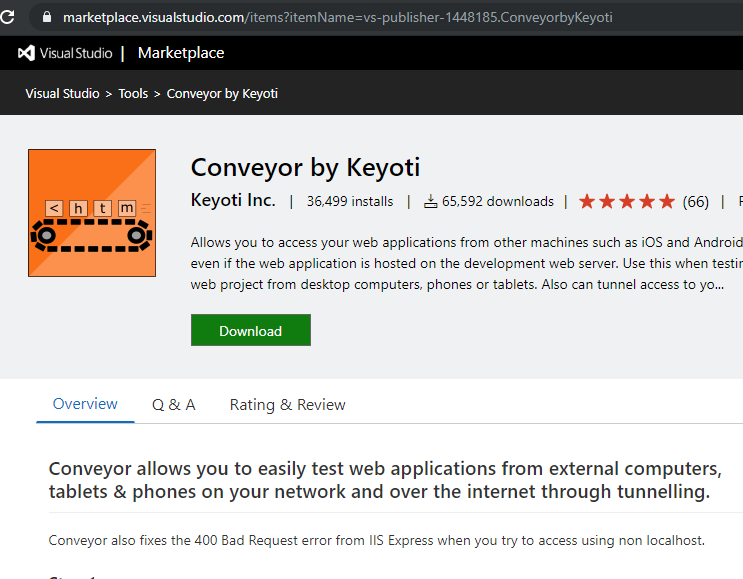
You can download the template from visual studio marketplace from this Link. Now after installing the template you have to restart visual studio (Make sure you run it as Administrator). next , you need to run the solution and clique on :
You can have more details by visiting Conveyor website or by watching their full demo .
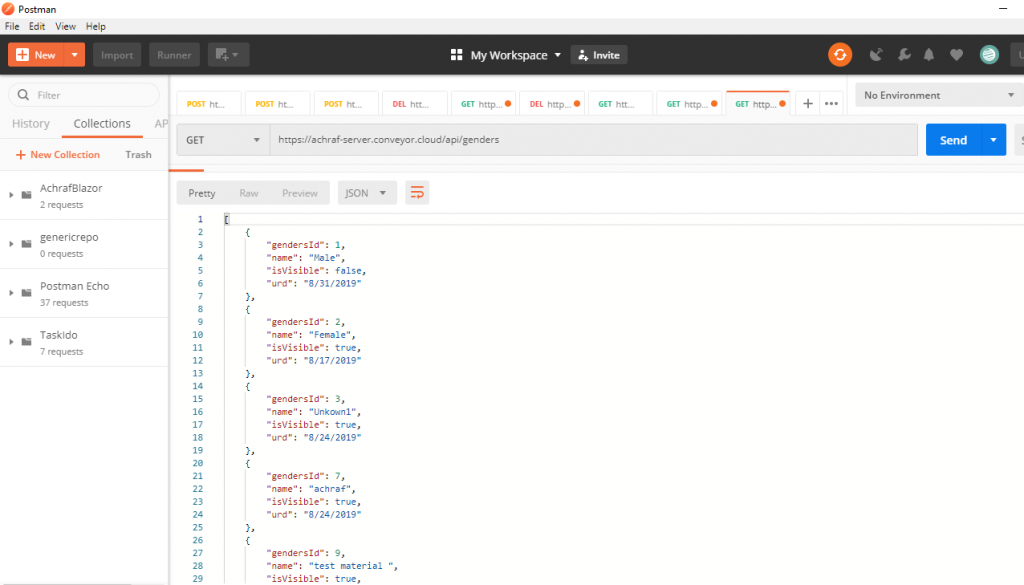
Testing our Web Api :
So last time we have created our Web Api and before going to consume the web-service , I always prefer to test it using postman .
The Postman is the most popular and the most powerful HTTP client for testing the restful web services. Postman makes it easy to test the Restful Web APIs, as well as it develops and documents Restful APIs by allowing the users to quickly put together both simple and complex HTTP requests. The Postman is available as both a Google Chrome in-browser app and Google Chrome Packaged App.
After checking that everything working fine and our calls to the Web-Api respond as we want now we can go and create our mobile application .
Xamarin Forms Project So first what is Xamarin forms ? Xamarin.Forms is an open source cross-platform framework from Microsoft for building iOS, Android, & Windows apps with .NET from a single shared codebase. You can read more about xamarin forms from this documentation. now Let’s create our project :
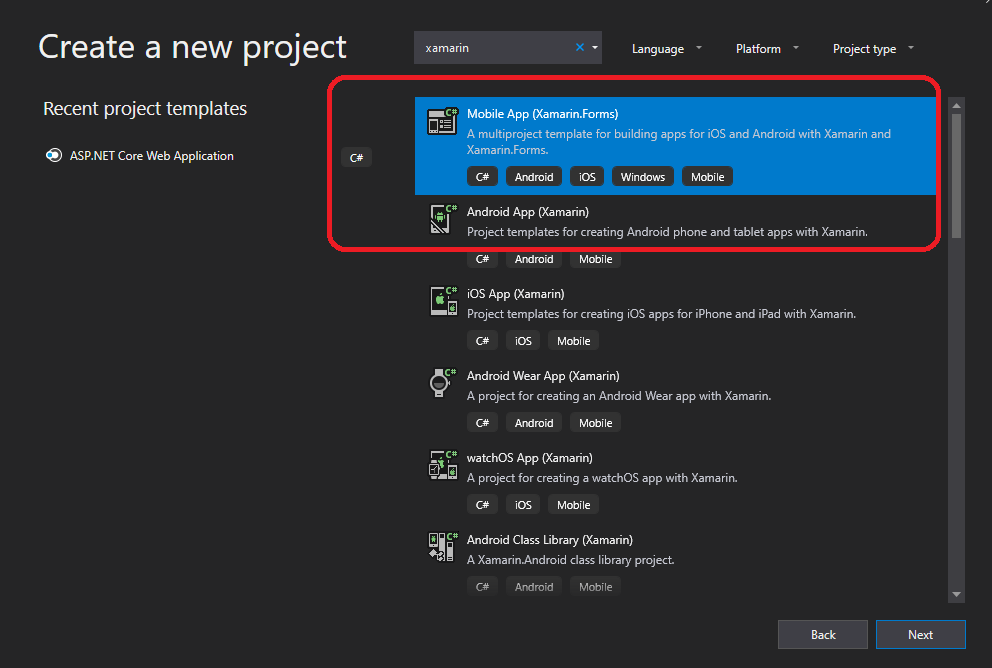
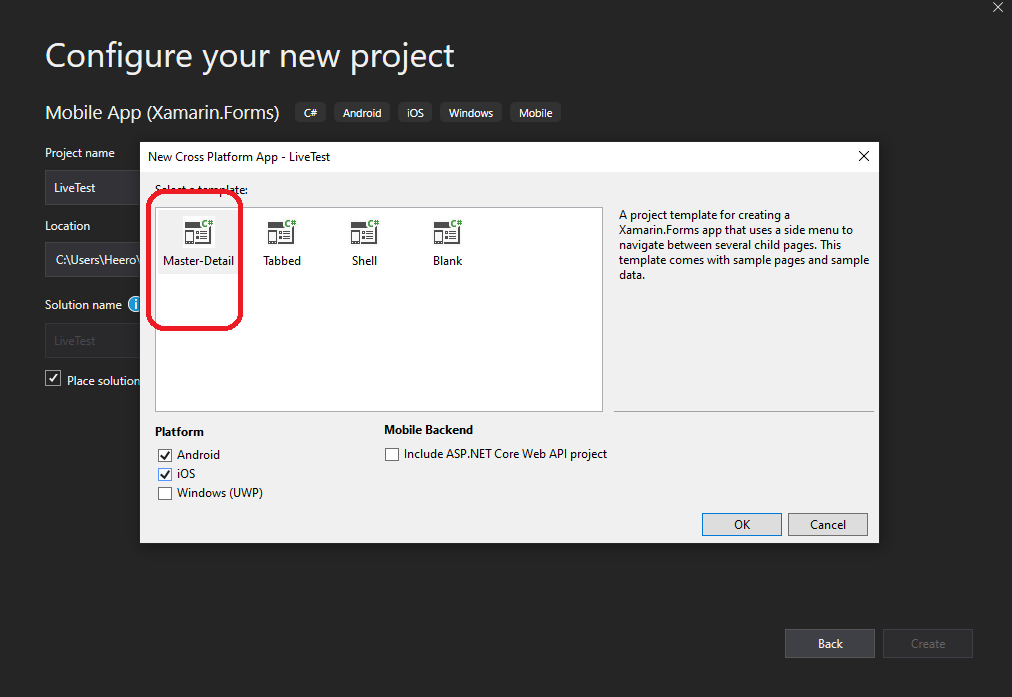
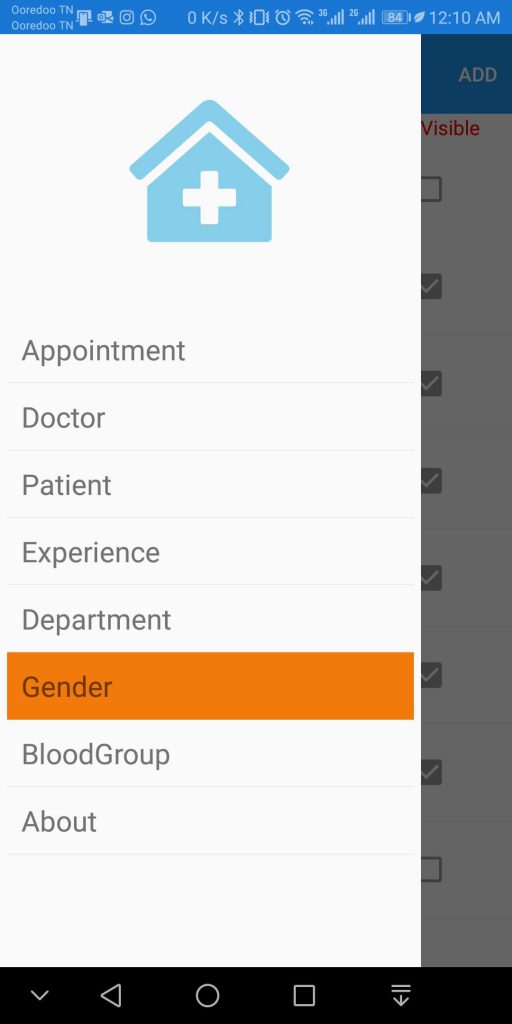
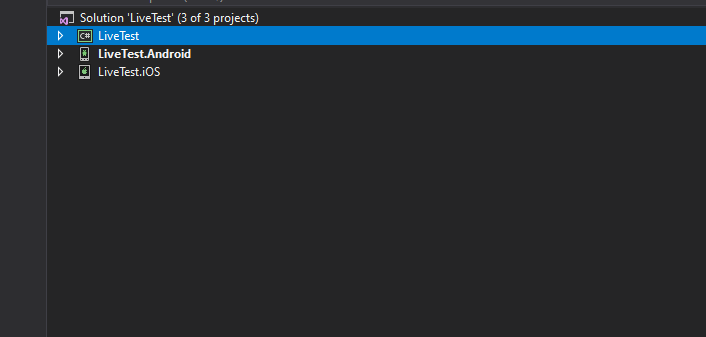
Since we need a menu , cause we have a list of doctors ,gender ,patient ,and to move around between those menus we should use the Master-Detail template . now , after choosing the right template , we will have a solution that contain 3 project ,the main project where we are going to create most of our code , an android project and and ios project as in picture below .
Now , before doing anything , we need to update all the packages installed in our solution by going to manage nuget packages for solution and updating all the nuget packages there and building the project . If we have a successful build , now we can start coding .
As I said ,we are going to use Mvvm . now what is Mvvm ? MVVM is a design pattern used to decouple user-interface (view), data (model), and application logic (view model). Xamarin has built-in support for the MVVM pattern including data binding, making it easy to follow this design pattern so that you can create application code that’s better tested and easier to extend without requiring radical changes . You can read more about it here .
So , now we are going to create four folder , Models ,Views and ViewModels and one for the dataservices. In our Modules folder ,we are going to create our modules , and for demo sample , we are going to use the gender class.
public class Genders
{
    public int GendersId { get; set; }
    public string Name { get; set; }
    public bool IsVisible { get; set; }
    public string Urd { get; set; }

}
Next , Inside our ViewModels folder we are going to create three classes , GendersViewModel , EditGenderViewModel and AddGenderViewModel .
public class GendersViewModel :BaseViewModel
{
     private List<Genders> _genders1;
    private  DataServices _dataServices = new DataServices();
    private bool _isRefresh;


    public List<Genders> _genders
    {
        get { return _genders1;}
        set  {

        _genders1 = value;
        OnPropertyChanged();

            }
        }

    public GendersViewModel()
    {
        GetGenders();

    }

    public bool isRefresh
    {
        get {return _isRefresh; }
        set
        {
            _isRefresh = value;
            OnPropertyChanged();
        }
    }

    public ICommand GetGendersCOmmand => new Command(async () =>

    {
        isRefresh = true;
        await GetGenders();
        isRefresh = false;
    });

    private async Task GetGenders()

    {
        _genders = await _dataServices.GetGenders();

    }

}
    public  class EditGenderViewModel
{
    public Genders TheSelectedGender { get; set; }
    private DataServices _dataServices = new DataServices();

    public ICommand EditGendersCOmmand => new Command(async () =>

    {
        TheSelectedGender.Urd = System.DateTime.Now.ToShortDateString();
        await _dataServices.PutGenders(TheSelectedGender.GendersId, TheSelectedGender);

    });


    public ICommand DeleteGendersCOmmand => new Command(async () =>

    {

        await _dataServices.DeleteGenders(TheSelectedGender.GendersId);


    });

}
public class AddGenderViewModel
{
    public Genders TheSelectedGender { get; set; }
    private DataServices _dataServices = new DataServices();

    public AddGenderViewModel()
    {
        TheSelectedGender = new Genders();
    }

    public ICommand sendGendersCOmmand => new Command(async () =>

    {
        TheSelectedGender.Urd = System.DateTime.Now.ToShortDateString();
        await _dataServices.PostGenders(TheSelectedGender);
    });


}


     public class DataServices

     {

   private string GenderUrl = Constants.GenderLink;

  #region Genders


    public async Task<List<Genders>> GetGenders()
    {

        var HttpClient = new HttpClient();
        var Json= await HttpClient.GetStringAsync(GenderUrl);
        var Genders = JsonConvert.DeserializeObject<List<Genders>>(Json);

        return Genders;
    }

    public async Task PostGenders(Genders genders)

    {

        var httpClient = new HttpClient();
        var jsonObject = JsonConvert.SerializeObject(genders);
        StringContent content =new StringContent(jsonObject);
        content.Headers.ContentType= new MediaTypeHeaderValue("application/json");
        var result=  await httpClient.PostAsync(GenderUrl, content);

    }

    public async Task PutGenders(int id,Genders genders)

    {

        var httpClient = new HttpClient();
        var jsonObject = JsonConvert.SerializeObject(genders);
        StringContent content = new StringContent(jsonObject);
        content.Headers.ContentType = new MediaTypeHeaderValue("application/json");
        var result = await httpClient.PutAsync(GenderUrl+id, content);

    }

    public async Task DeleteGenders(int id)
    {

        var HttpClient = new HttpClient();
        var responsen = await HttpClient.DeleteAsync(GenderUrl+id);

       // return Genders;
    }

    #endregion
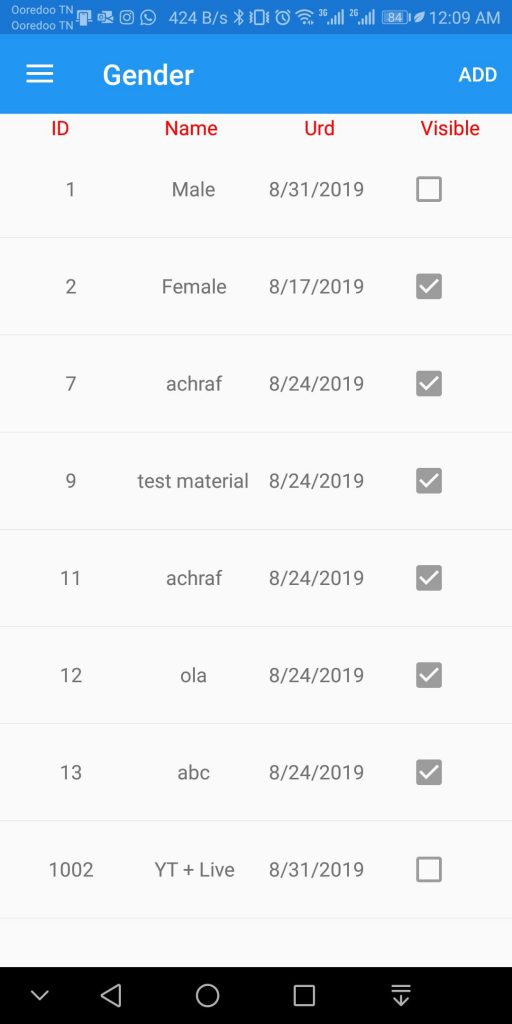
Now our moduels and viewModules are ready , we need to create our views , by that I mean our pages For our blog , we are going only to create the GenderPage which will contain the list genders .
<ContentPage.BindingContext>

    <viewModels:GendersViewModel></viewModels:GendersViewModel>

</ContentPage.BindingContext>


<ContentPage.ToolbarItems>
    <ToolbarItem Text="Add" Clicked="GoToAddGender" />
</ContentPage.ToolbarItems>


<ListView
x:Name="GenderListView"
HasUnevenRows="True"
ItemsSource="{Binding _genders}"
ItemTapped="GenderListView_OnItemTapped"
IsPullToRefreshEnabled="True"
RefreshCommand="{Binding GetGendersCOmmand}"
IsRefreshing="{Binding isRefresh}">
<ListView.Header>
    <Grid >
        <Grid.ColumnDefinitions>
            <ColumnDefinition Width="*" />
            <ColumnDefinition Width="*"/>
            <ColumnDefinition Width="*"/>
            <ColumnDefinition Width="*"/>
            </Grid.ColumnDefinitions>
        <Grid.RowDefinitions>
            <RowDefinition Height="Auto" />
        </Grid.RowDefinitions>
            <Label Text="ID"  TextColor="Red" FontSize="Small" Grid.Column="0" Grid.Row="0"  HorizontalOptions="Center"/>
            <Label Text="Name" TextColor="Red" Grid.Column="1" Grid.Row="0" HorizontalOptions="Center" VerticalOptions="Center"/>
            <Label Text="Urd" TextColor="Red" Grid.Column="2" Grid.Row="0" HorizontalOptions="Center" VerticalOptions="Center"/>
            <Label Text="Visible" TextColor="Red" Grid.Column="3" Grid.Row="0" HorizontalOptions="Center" VerticalOptions="Center"></Label>
        </Grid>
</ListView.Header>
<ListView.ItemTemplate>
    <DataTemplate>
    <ViewCell>


<Grid Padding="10">
    <Grid.ColumnDefinitions>
        <ColumnDefinition />
        <ColumnDefinition />
        <ColumnDefinition />
        <ColumnDefinition />

    </Grid.ColumnDefinitions>
                    <Label Text="{Binding GendersId}" Grid.Column="0" HorizontalOptions="CenterAndExpand" VerticalOptions="Center"></Label>
                    <Label Text="{Binding Name}"  Grid.Column="1"  HorizontalOptions="CenterAndExpand"  VerticalOptions="Center"></Label>
                    <Label Text="{Binding Urd}"  Grid.Column="2"  HorizontalOptions="CenterAndExpand" VerticalOptions="Center"></Label>
                    <CheckBox IsChecked="{Binding IsVisible}" IsEnabled="False"  Grid.Column="3"  HorizontalOptions="CenterAndExpand" VerticalOptions="Center"></CheckBox>

                </Grid>

    </ViewCell>


</DataTemplate>

</ListView.ItemTemplate>
</ListView>
private async void GoToAddGender(object sender, EventArgs e) { await Navigation.PushAsync(new AddGender()); }

    private void GenderListView_OnItemTapped(object sender, ItemTappedEventArgs e)
    {
      var _Genders=  e.Item as Models.Genders;
      Navigation.PushAsync(new EditGenders(_Genders));
    }
Now , as you can see , we are binding to GendersViewModel were can all our commands. And like that we will have this page .
Now, for the next steps , I decided to enhance the ui for the web app and the mobile app too ,hide elements when isvisibe is set to false and use DataGrid for both projects .
I hope this was helpful , you can find the full code inside my github repo .